Every business needs a great website. The world is run by Google and most potential customers look for businesses online.
Getting a website up can be confusing and costly. But I want to relieve both those annoyances in this guide.

In this post I’ll teach you how to launch your own business site online by yourself. You don’t need any technical experience or any knowledge of coding or hosting. This is one of the simplest techniques for small businesses that just need a web presence without the hassle.
And best of all this guide can work for everyone whether you’re launching a new idea or already run an established company. If you follow this guide you can have your own website online within a day and you’ll save a lot of money by managing your own website.
This may seem daunting at first but trust me, anyone can do it.
Before getting started I want to clarify the whole process to hopefully make this easier to digest.
In this guide I’ll show you how to create your site using a free platform called WordPress. This started as a blogging tool but it has quickly grown into the most popular web platform currently powering 25% of the Internet.
WordPress has a worldwide community of developers adding features and patching security holes. It’s free forever and it has a lot of free themes to choose from.
It does have a minor learning curve but since it’s so popular you can Google any question you have and likely find an the answer.
The overall process of launching a small business site can be broken down into a few stages:
This process can apply to all businesses and entrepreneurs whether you’re a mechanic, electrician, attorney, or really anyone that runs any kind of business.
I’ll help you through every step and even share some tips that I’ve learned designing small business websites for over 10 years.
Trust me when I say WordPress is the best thing to happen to the web. It lets small business owners create their own websites on a budget and offers full control over the design & content.
But enough jabber, let’s get started!
The very first step is to pick your domain name. This goes hand-in-hand with a hosting account so you’ll usually register both at the same time.
But spend a bit of time thinking about what domain you want. A domain is the .com address that people type to view your website. For example, Apple computers owns the domain apple.com.
Your domain name can be anything that isn’t already taken. Most people search for companies in Google anyways so it’s not common for people to memorize your domain.
However there are some tips you should keep in mind when picking a domain.
Many domain names are already taken so don’t get discouraged. If your business name is already taken you can always add your state or city.
For example if you’re an electrician with a business named Tom’s Electric you might want to get tomselectric.com. Unfortunately it’s already taken. But let’s say you operate out of Seattle.
In this case you could try tomselectricwa.com or tomselectricseattle.com.
Yes these examples are longer but they’re still readable and to-the-point. Most people will search for your company in Google so the domain just needs to be somewhat relevant.
For the domain+hosting setup I recommend BlueHost because it comes with a free domain name.
There are many other reasons why I recommend BlueHost for small businesses: affordable, reliable, and easy to work with. But they offer a free domain with each new account and that’s a sweet deal.
And you get free e-mail addresses with BlueHost so you can make a business account like yourname@yourbusiness.com. Most companies charge extra for e-mail so you do you get a lot of freebies with BlueHost.
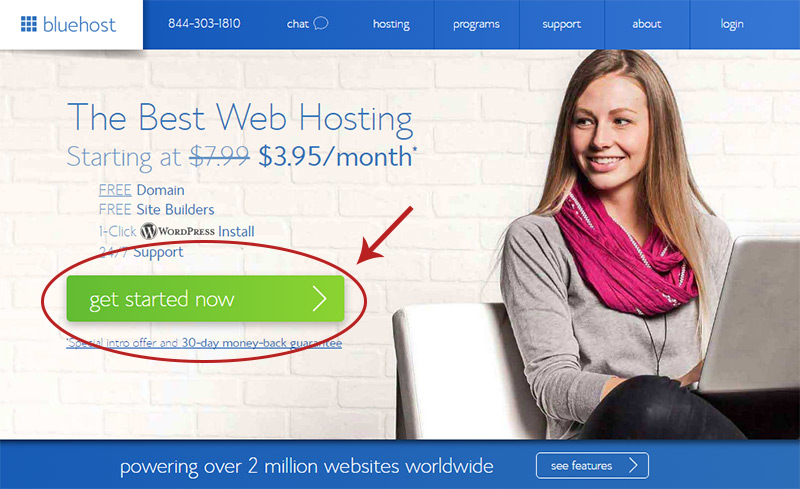
Visit the signup page and click the “get started now” button.
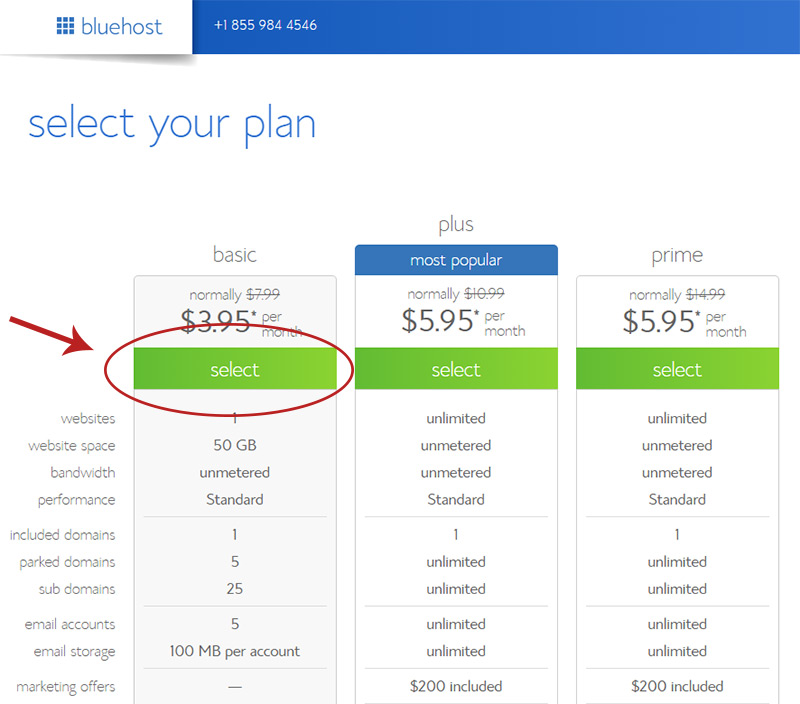
You’ll be directed to a signup page with three different plans. Click the plan on the far left side labeled “basic”.
This plan is the most affordable and it still comes with the free domain plus 5 free e-mail addresses. Perfect for launching a new business site.
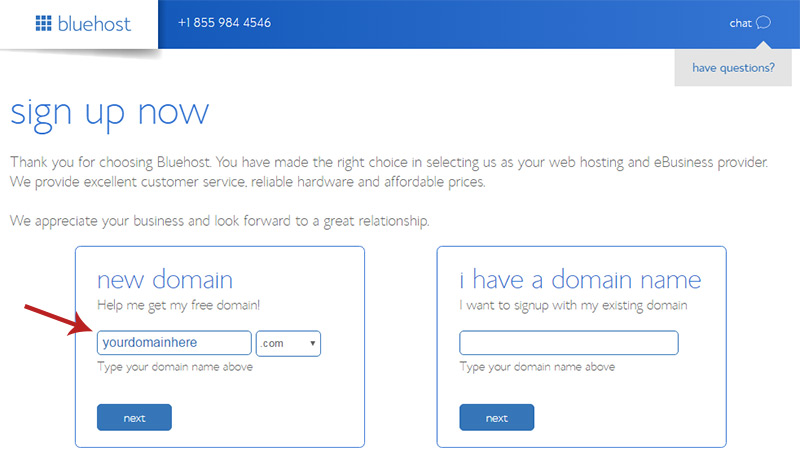
Next you’ll have to enter your domain name. Make sure you enter it in the left box labeled “new domain”.
If you enter a domain that’s already taken you’ll get a small notice and some alternate suggestions. Just keep trying until you find a domain that’s available.
It may take a few tries but don’t get discouraged! There are still plenty of awesome domains out there if you get creative.
On the last page you’ll enter your personal contact info along with payment details.
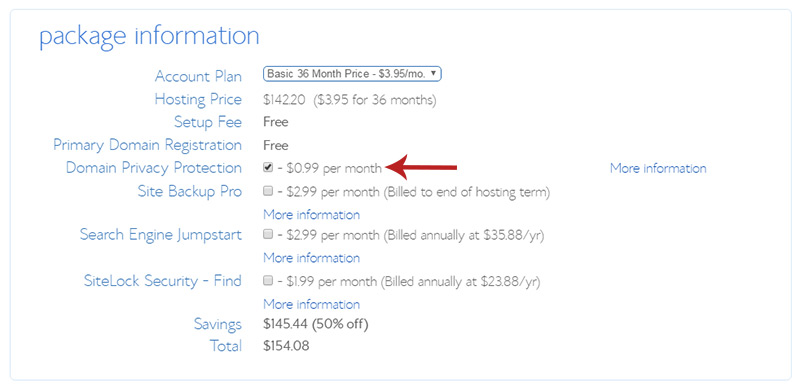
But one section you should update is the middle box titled “package information”.
Start by un-checking all the boxes except the box for domain privacy. This is probably something you’ll want to keep unless you don’t mind having your contact info tied to the domain.
This is a somewhat complicated subject but I’ll explain briefly.
Whenever a new domain is registered it goes through a clearing house called ICANN. Every new domain must have some contact details and anyone can look up these details using something called a WHOIS search.
If you uncheck domain privacy then your name, address, and e-mail will appear in the contact details. But if you keep domain privacy then BlueHost’s contact details appear instead of yours.
Most people like their privacy so I think domain privacy is a must-have feature.
Lastly you might want to change the account plan from the 36-month cycle to the 12-month.
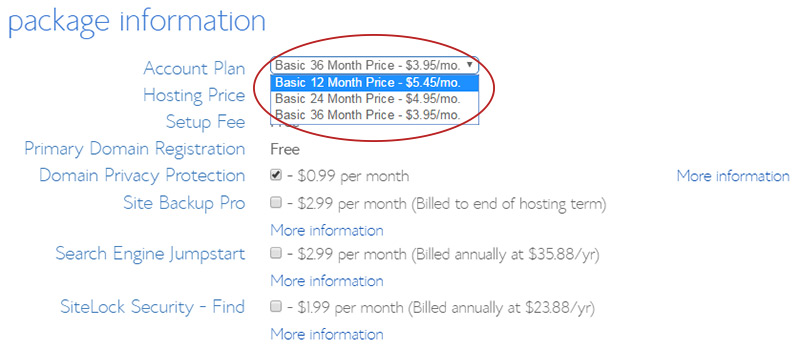
With 36 months you’ll pay a larger fee upfront but you’ll get a lower monthly cost. If you go with 12 months you’ll pay much less right now but it’ll total a little more per month.
There’s no wrong choice here and all the monthly rates are very cheap. Pick whatever you feel most comfortable paying up front because they’re all pretty great deals.
Once all your info is complete just click the submit button at the bottom.
The next page should give you a success message and you should get a confirmation e-mail from BlueHost. Now you can log into your new BlueHost account and setup WordPress.
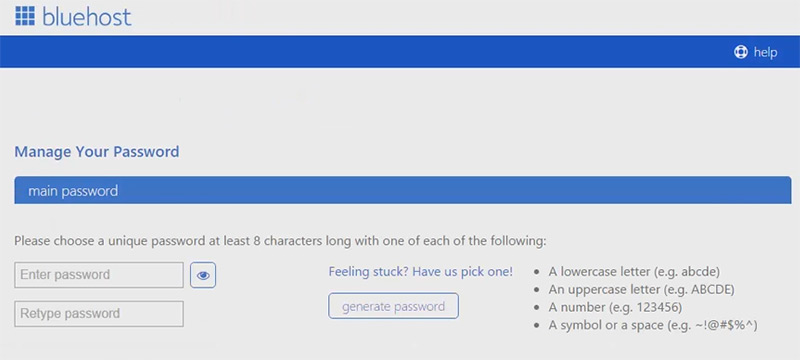
To log into BlueHost you may first need to create a password. You’ll be prompted to create a password after you finish the signup process and there should be a link in the confirmation e-mail too.
Once you create a password and login you should see your dashboard. If you can’t get in just visit the BlueHost homepage and click “login” near the top.
You may need to create a password for your account. Make sure it’s something you’ll remember(and write it down if you might forget!).
Your main dashboard should look something like this.
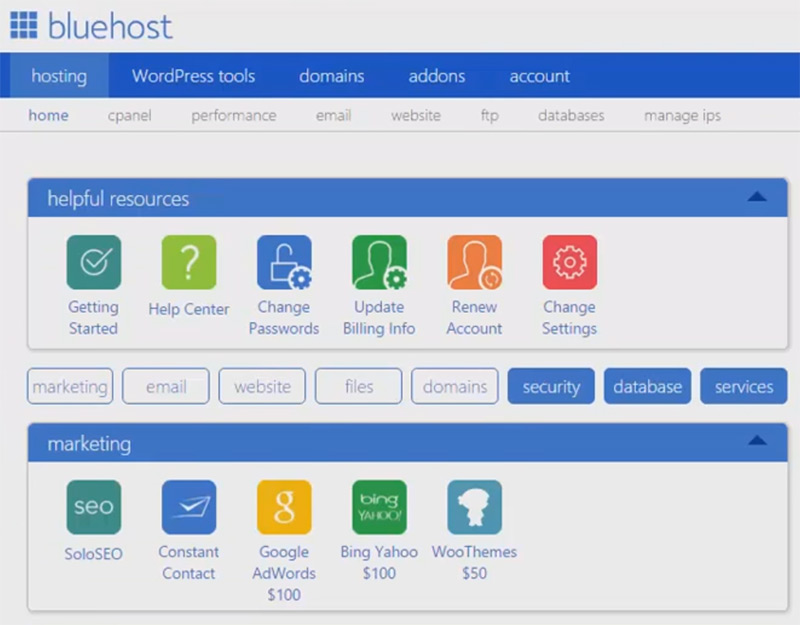
You’ll have full access to all of BlueHost’s features like free e-mail and website setup.
Scroll down to the 4th box on the page labeled website. The 2nd blue icon in this box should have a big W logo with the text “Install WordPress”.
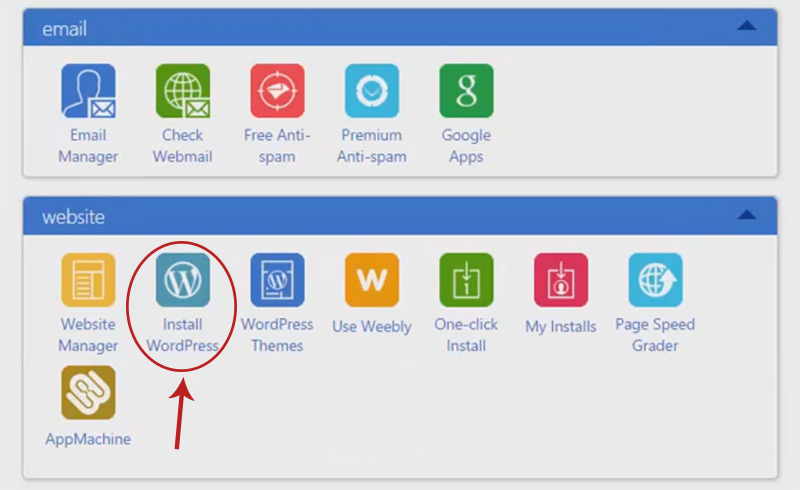
Click this link to start the install process.
On the next page you’ll find a bunch of upsells that you don’t need. Just click the green “install” button near the top.
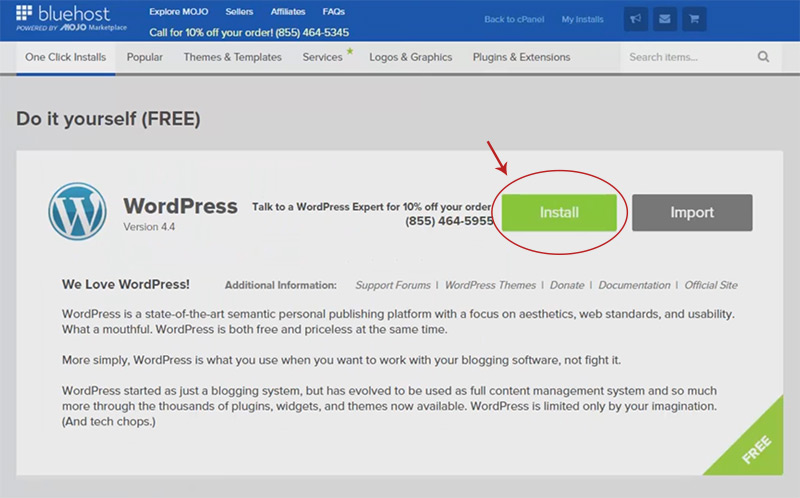
Now we can start actually creating your WordPress site.
First you’ll need to select which domain you want to use. Since you just got a free one that should be it, however you can choose between a www or non-www prefix.
There is no difference other than looks so pick whichever one you like best.
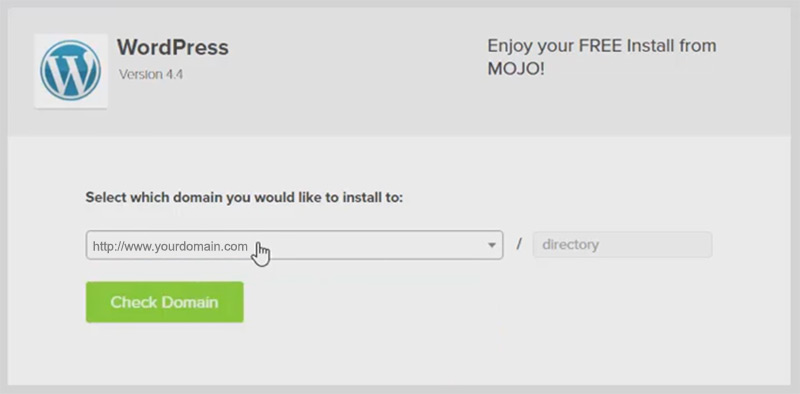
Click the “check domain” button to move forward. BlueHost will make sure the domain is free for a WordPress installation.
If everything looks good(which it should) then you’ll move onto the final step.
Click the checkbox labeled “show advanced options” and you should see three new text fields. These are necessary to help setup your new WordPress install.
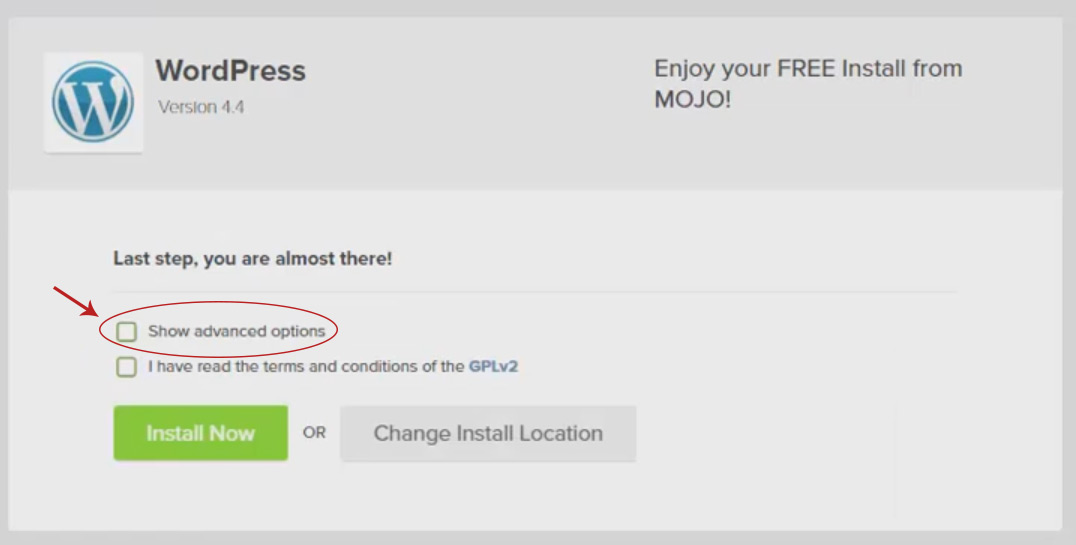
The first box is for your site name so this should be the name of your business.
The other two boxes want a username and password.
Note this username/password does not need to be the same as your BlueHost info. The password you created earlier is only for BlueHost.
What you’re creating right now is the login info for your WordPress website. Pick a username & password that you’ll remember and feel free to write them down too.
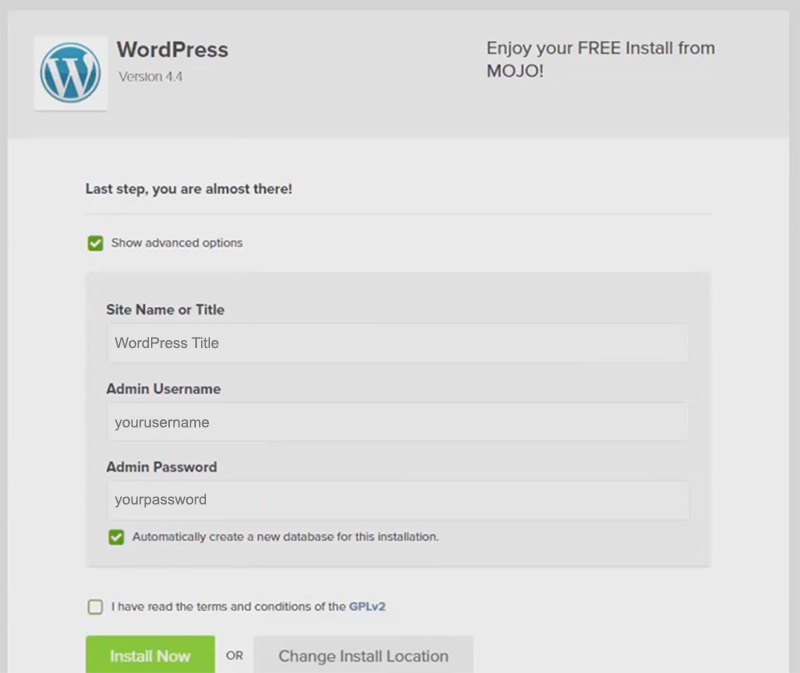
Once you’ve filled out all three fields check the box at the bottom for terms & conditions. Then click “install now” and let it run.
This process may take a couple minutes to get WordPress all set up. Once it’s ready you’ll see a notice that it’s complete and you can log into your site.
You can see your default WordPress install by visiting your new domain in your web browser. So if you registered the domain mybusiness.com then you would type that into your browser and hit enter.
You should see a default WordPress homepage — boring but online.
To log into your website you’ll need to add /wp-admin/ to the end of your domain.
Let’s say your website is mybusiness.com. To access the admin panel you should visit mybusiness.com/wp-admin/ in your web browser.
You should get a screen that looks like this.
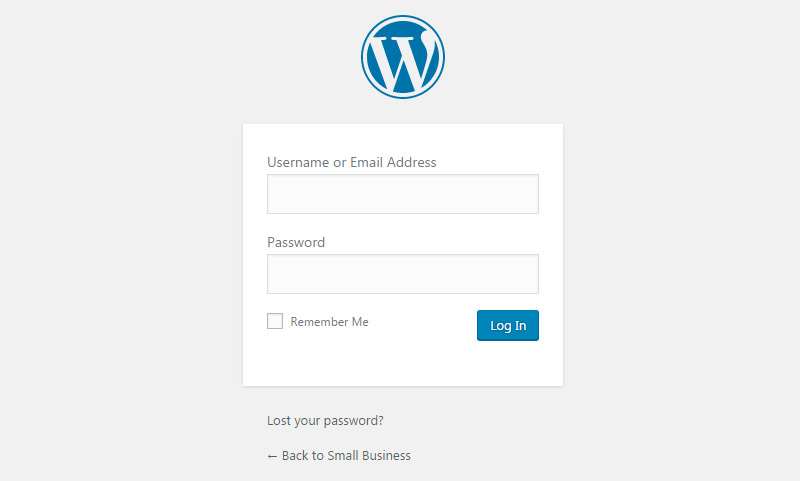
Enter the admin username & password you just created and you should get into your new WordPress dashboard.
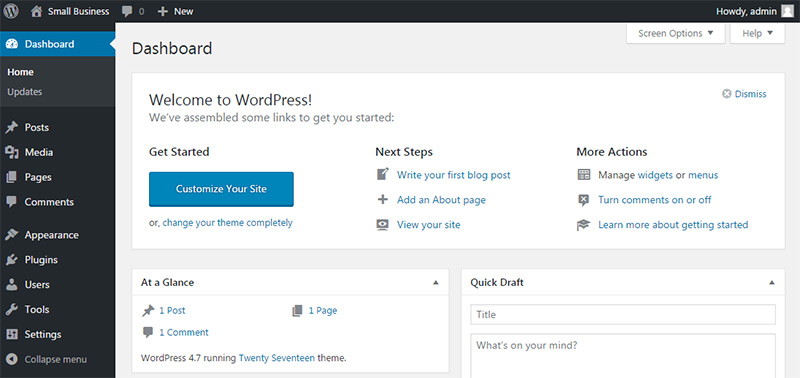
You now have a brand new small business site, albeit a tad generic and boring.
But now that everything’s installed we can get to the fun part: customizing your website.
Every default install of WordPress looks pretty bland. Thankfully there are plenty of options you can change to customize the features.
Find the “settings” link in the left-hand menu and click.
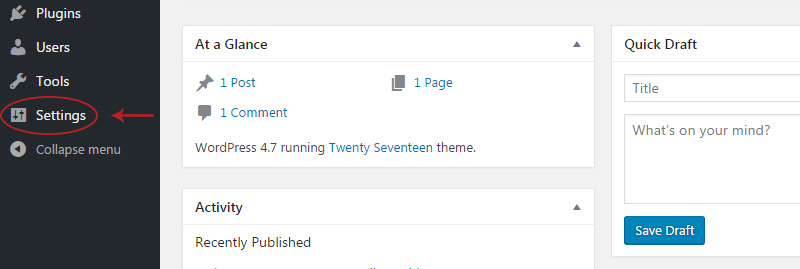
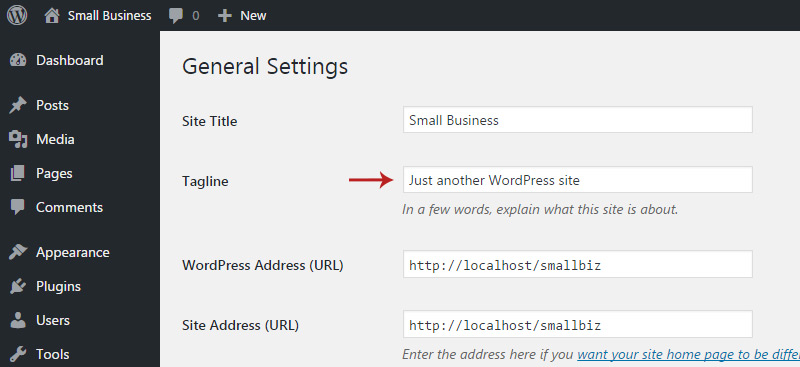
This page has multiple sub-pages for different settings that affect your site. On the main settings page you’ll see a title and tagline near the top.
If your company has a tagline you should enter it here. If not then just delete it and leave the space blank.
To save any changes you make scroll down to the very bottom and click the blue “save changes” button.
Now look back to the left side menu and underneath the Settings link you should see a sub-link titled “permalinks”.
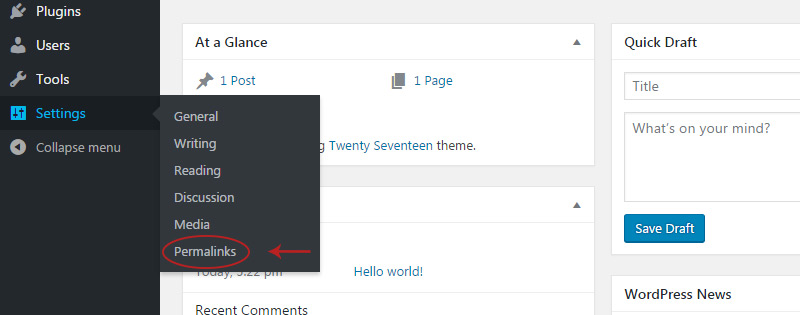
Click that and you should see a few different options for styling your website’s URLs.
By default WordPress uses a vague ID number for the URL which is terrible. Instead I recommend using the “post name” setting near the bottom.

This keeps all your URLs short and to the point. But you can always try a different setting because you can easily change permalinks at any time.
Back under the settings menu look for a link titled “discussion”.

This page lets you change how user comments work and if users are allowed to sign up for commenting on your website.
Since you’re building a small business website it doesn’t make sense to keep comments unless you want them on your blog. If you do want comments then just leave this be.
If not then un-check the box labeled “Allow people to post comments”.

Save changes and then click on the “Pages” link higher up in the admin nav bar.
WordPress is a blogging platform by default so the homepage just shows a bunch of blog posts. But with a small tweak we can hide the blog posts and show a default homepage.
Click the “pages” link in the admin menu and you should see a list of all the pages on your site. So far there should only be one default created by WordPress.

Click the “Add New” near the top and you’ll get a new page form.
In the title box at the top enter “Homepage” without quotes. You can also enter a small bit of writing into the page body, although it doesn’t really matter at this point.
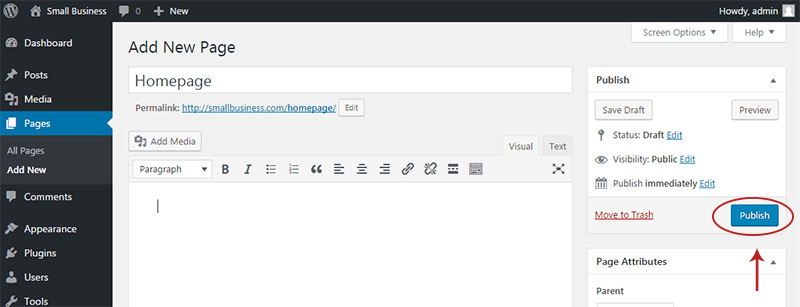
Now click the blue “Publish” button in the top-right corner. This page will behave like a surrogate homepage and all the content you add here will be displayed on the homepage.
But you also need to make a different page to hold the blog archive.
Even if you don’t want to run a blog you still need to move the posts somewhere because there’s no way to outright disable the blog feature.
So click “add new” at the top and now enter a page title of “Blog”. This does not need any body content so leave that blank and click publish.
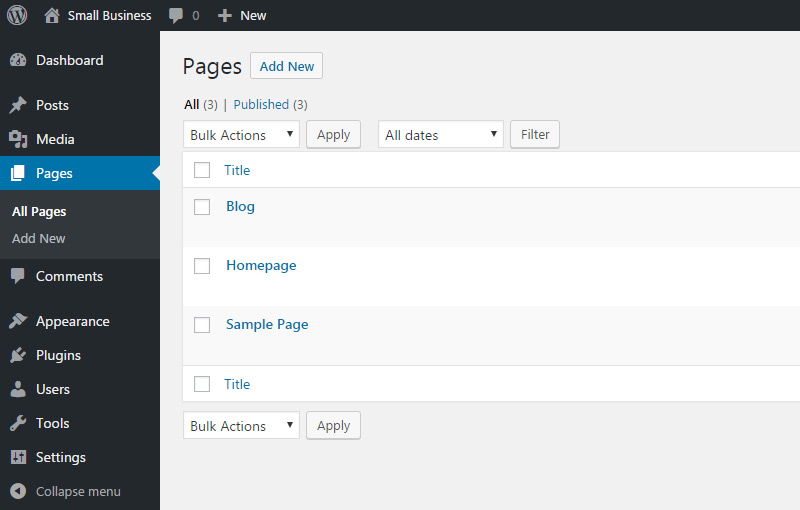
Now you should have three pages: the default example page, a “homepage” page, and a “blog” page.
Hover the settings link and look for a sub-link labeled “reading”.
Click that and the first setting you’ll see at the top is a button for changing your site’s front page.
Click the second radio button labeled “a static page” and the two dropdown menus underneath should brighten up.
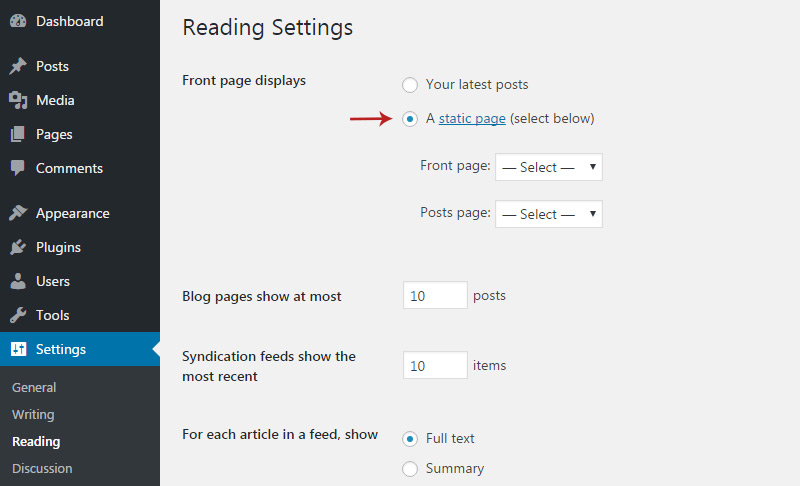
Click on the “front page” dropdown and choose your newly-created Homepage.
Then click the other dropdown and select your Blog page.
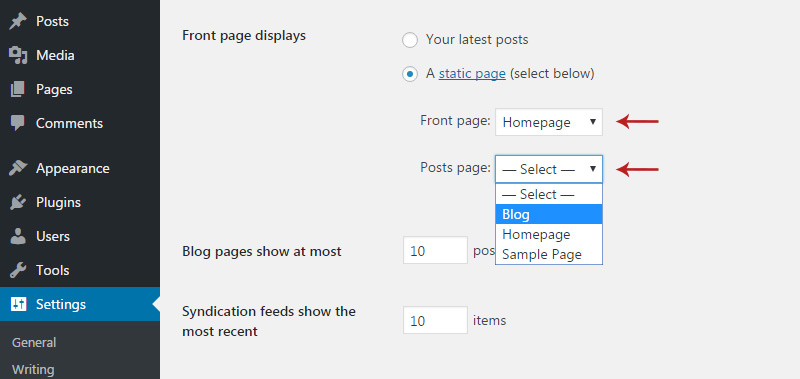
This will set your blog archive to the URL /blog/ and your homepage will display whatever content you add into that “Homepage” page you created earlier.
Hit save and then visit your site by clicking the house icon link in the top-left corner.
It should still look pretty boring but at least we’ve made some progress.
The next step is to pick out a sweet design that blends with your small business.
Your website’s design is the first thing your visitors see when landing on your site. It’s crucial that you find a design matching your company’s style and services.
WordPress has thousands of pre-built designs called themes and new ones are developed every day.
Before digging into themes you should first consider if you want a free theme or a paid theme. The paid themes will always be higher quality and offer more features.
But if you’re trying to save money it’s a good idea to stick with a free theme now and possibly upgrade later.
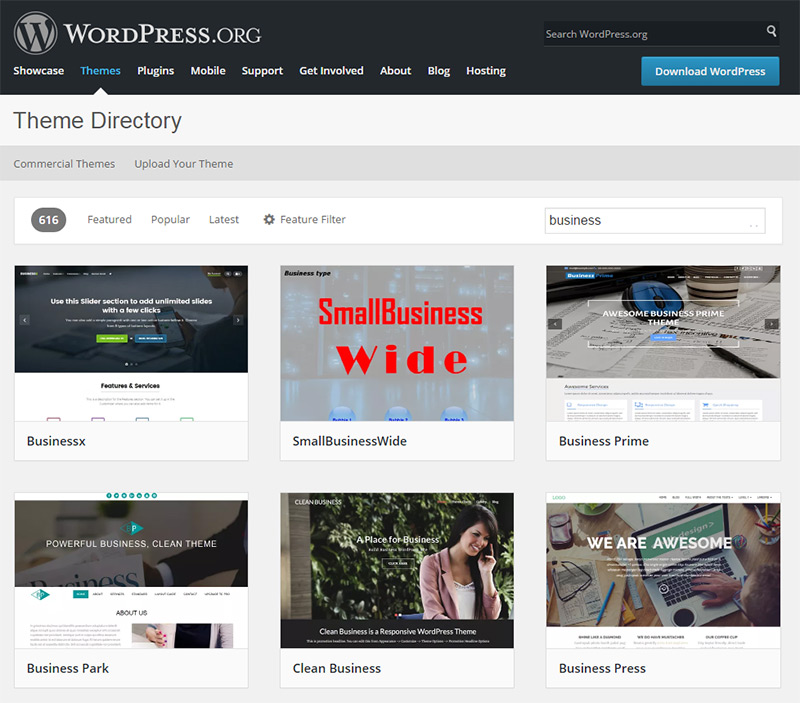
You can view all free themes in the WP themes directory and do a search for whatever you need.
Paid theme prices vary wildly but the absolute best quality themes are on ThemeForest.
This site is like a marketplace where hundreds of different designers submit their themes for sale. ThemeForest has the largest volume and variety, and most paid themes average between $30-$60 a piece.
Remember that all themes can be customized so your site doesn’t need to look exactly like the demos.
Also be willing to search for more specific themes based on your small business. For example, if you’re a plumber you can find some decent themes by searching “business”. But if you do a search for “plumber” you’ll find more targeted results with both free themes and paid themes.
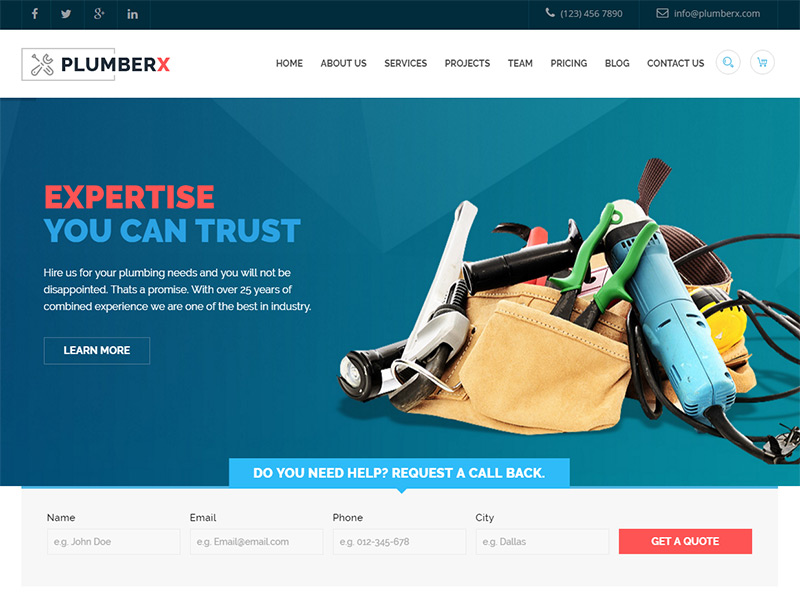
In my experience ThemeForest has a much larger selection of more specific themes.
You can find themes for electricians, law offices, handymen, moving companies, manufacturing, basically anything you want.
This is also true with free themes but you’ll be limited to more basic designs. However a basic design is really all you need to just get a site online.
Since there are literally thousands of themes you could pick I’d rather not list them all here. But I will list a few of my favorite themes for everyday small and medium businesses.
Installing a theme is incredibly simple but it’s a little different for a free theme vs. a paid theme.
Let’s walk through both options, starting with the free theme install.
You start by clicking the “Appearance” link in the admin menu.

On this page you’ll see all the themes currently installed.
WordPress lets you install a bunch of themes and keep them saved on your site, but you can only have one active at a time. This is a great way to test different themes and see which ones you like best.
From this page click the “add new” link near the top.
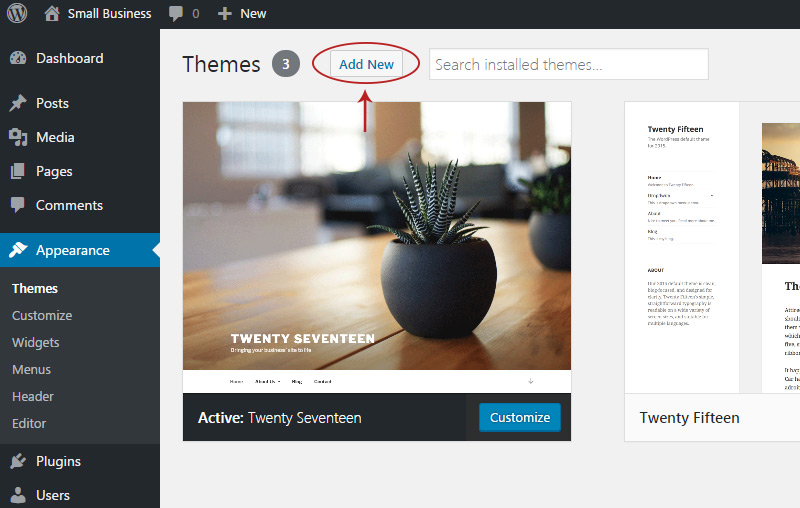
You should see a list of featured themes from the WordPress website. These are all free themes so you can browse through and install any you like by hovering and clicking the blue “install” button.
However let’s say you want to install a specific free theme you found online. In this case I’ll use the Movers Packers theme which can work for almost any small business.
To install this move to the top-right search field and type the name of your theme. In this case I’ll type movers packers.
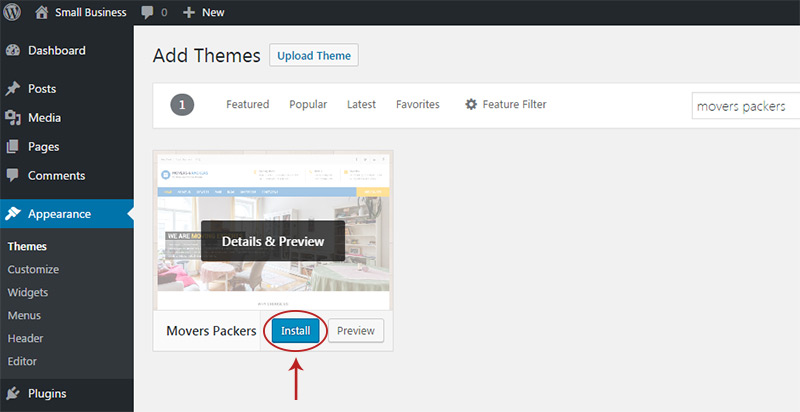
The list of themes should auto-update and you should see your theme.
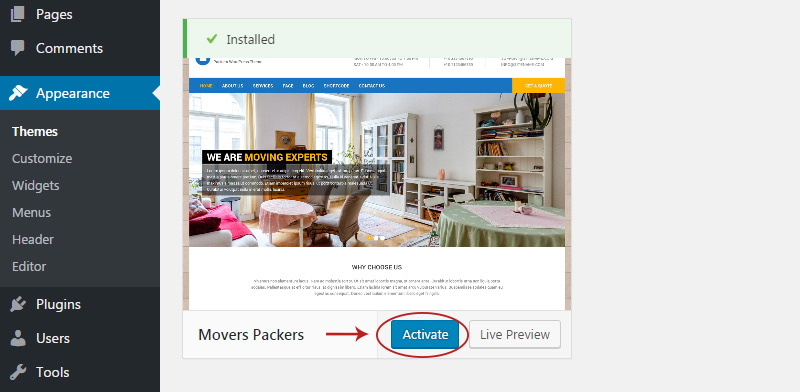
Now you can hover and click the blue “install” button to add it to your site. WordPress downloads the files automatically so you don’t have to do anything.
Once installed you just click “activate” and presto! Your new theme is live.
Installing a premium theme is a tad different but follows very similar instructions.
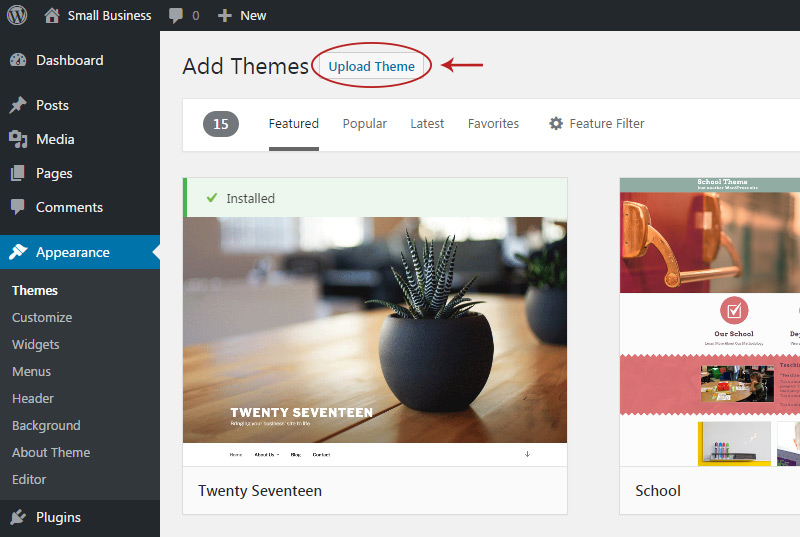
Click the “Appearance” link and then click the “add new” link near the top.
The search bar is only used for free themes. To install a premium theme you should upload the files in a .zip format.
Thankfully whenever you buy a theme from ThemeForest it always comes with a .zip download. So in the “add new” page find the button near the top labeled “upload theme”.
Click this and a button should appear. Click the “choose file” button to browse your computer for the downloaded .zip file from ThemeForest.
Select it and click “install now”. It may take a few moments to upload the file but everything should go smoothly. Once it’s uploaded you can activate the theme and start toying around.
There’s actually a lot you can change in WordPress and because each theme has its own features I can’t possibly cover everything.
But I’d like to briefly go over the customization menus underneath the “Appearance” link.
The link right underneath appearance should be “customize”. This is a powerful feature unique to WordPress that lets theme developers add custom features to each layout.
You can usually change site colors, header & background images, font styles, page widgets, and lots of other stuff.
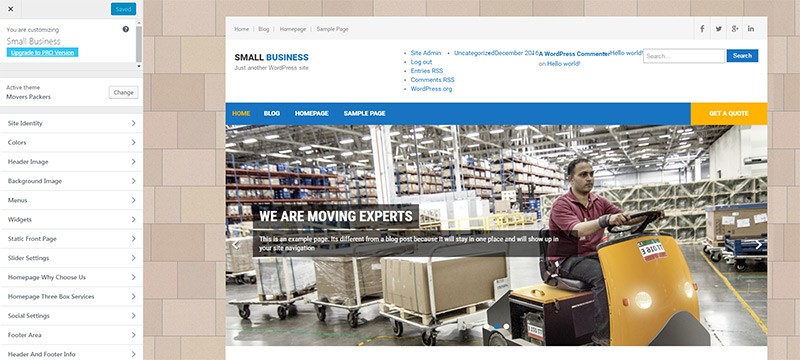
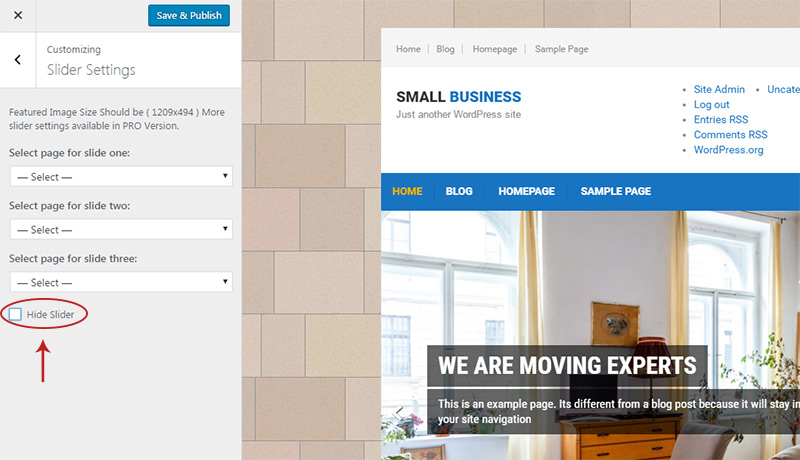
For example the Movers Packers theme comes with a default photo slider. In the customize menu it’s easy to change which photos appear in the slider and if the photos link to other pages on the site.
Or it’s possible to completely disable the slider altogether.
The customize menu is something you should toy with and see what you can change.
All the settings are incredibly simple to pick up and you should have no problem learning the ropes with 30-60 minutes of tinkering.
And nothing you do is permanent so you can’t possibly break your theme this way.
You can see a live preview in the right pane so whenever you make a change you’ll be able to preview it before saving.
Another feature we should cover is the widgets section. This link is traditionally found right underneath the “customize” link.
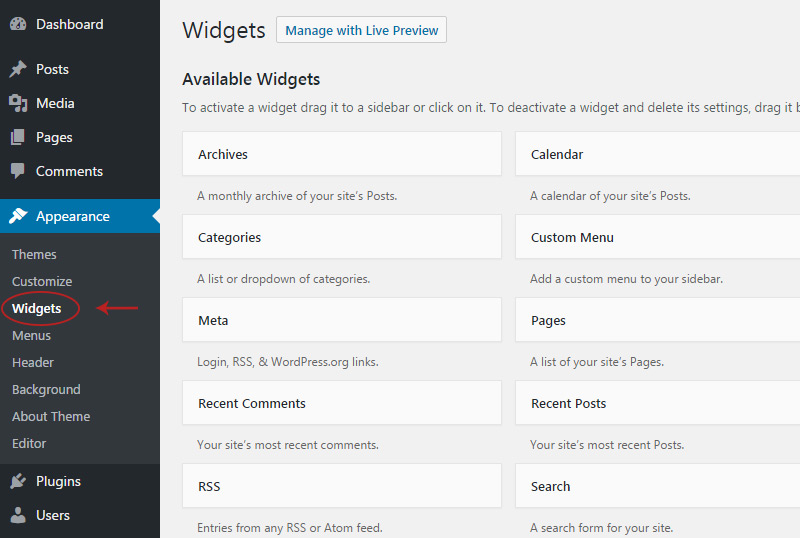
Theme designers create areas of the theme that are considered “widgetized”.
This simply means you can add or remove little blocks called widgets by dragging and dropping whatever you want on the widgets page.
So for example the Movers Packers theme offers widget areas for the sidebar and in the header.
You can add/remove whatever you want including a search bar, contact details, or a Google Maps location of your business.
Widgets are so easy to use because you don’t need to know any code to make them work. Just drag and drop whatever you want, and if it doesn’t look good remove it.
The more you practice using widgets the more comfortable you’ll get.
Just remember you cannot permanently screw up anything so there’s a lot of leeway to try stuff.
Lastly I want to go over the “menus” link found right underneath widgets.
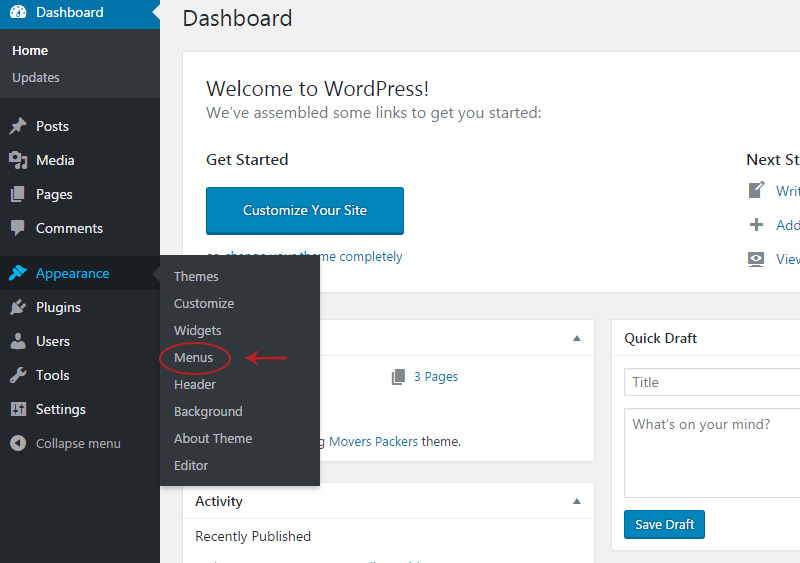
This page lets you build navigation menus for your business website.
Menus only appear in predefined areas of a theme so you’ll be limited based on how the designer created your theme. However you can place any links you want including pages, blog posts, or even external links to other websites.
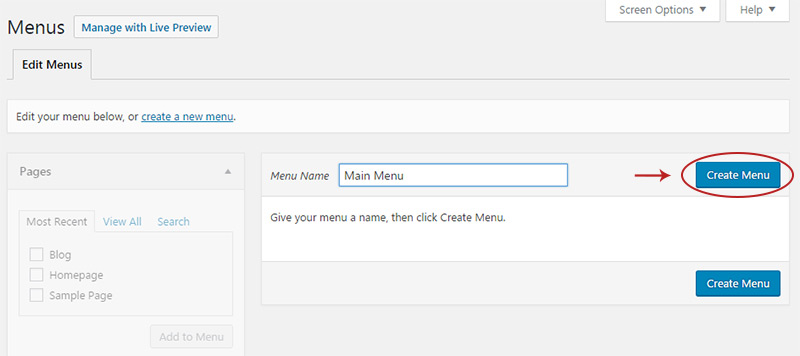
Let’s walk through how to create a menu for your top navigation.
Start by entering a menu name in the input box. The name is not public so it’s just a way to help you organize your menus. I’ll enter “main menu” and click the save menu button to the side.
Now you can add links into this menu and rearrange them as needed.
It’s best to keep your menus as brief as possible. Too many links can overwhelm visitors with too many options. But make sure your most important pages are added to the menu(services, contact, etc).
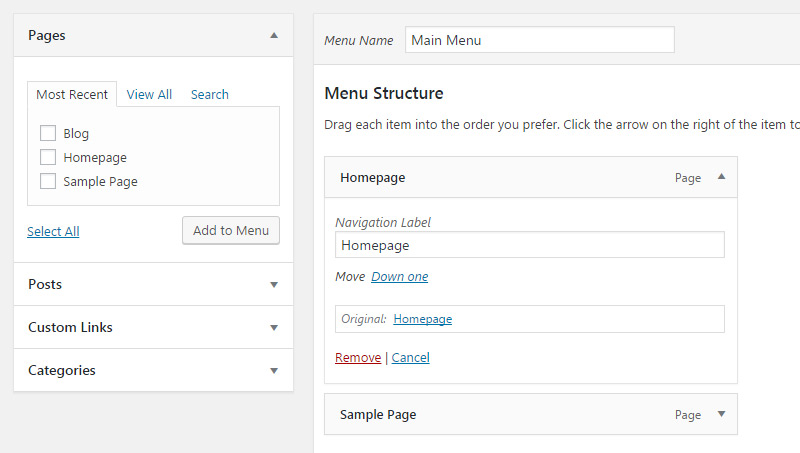
To add a new page you can click the check box in the left-hand column, then click the “add to menu” button.

You could also pick between blog posts, category pages, or even add your own links directly.
Most company websites just need links to pages since few companies run their own blog.
Once you have some pages added to the menu you’ll be able to drag & drop them to rearrange the order. And if you click the little down arrow to the side you can change the link text.
Remember that nothing you do here is permanent so you can always make changes later.
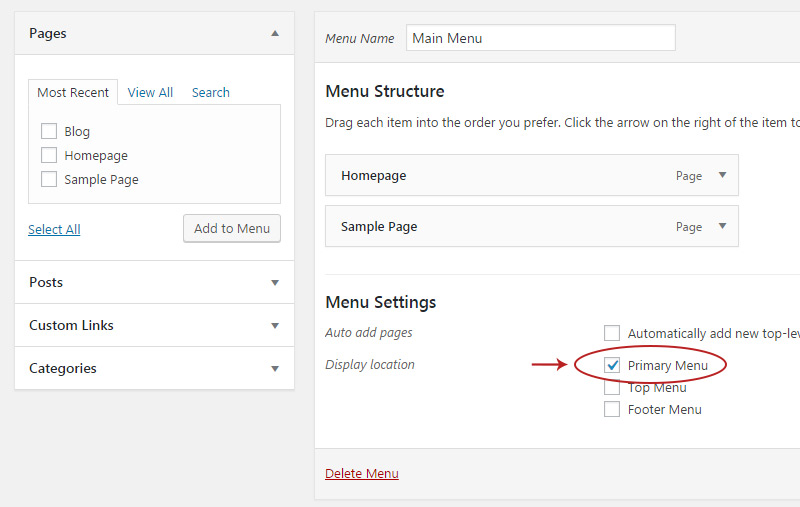
Once you’re happy with the menu links you’ll need to choose where this menu should appear on the site.
With my example of the Movers Packers theme I have three menu locations: primary menu, top menu, and footer menu.
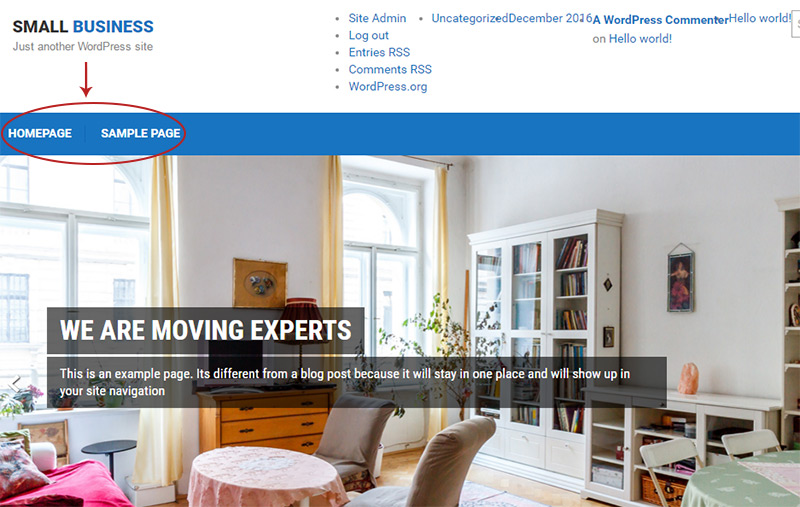
Here’s a screenshot of what this looks like:
You could add one menu to all 3 areas but that’s redundant. Each menu should serve a purpose so you really don’t need to add menus just for the hell of it.
Every theme should have a “primary menu” location which represents your main navigation.
Click this checkbox and then click the blue “save menu” button to the right. Now these links should appear in the main menu for all pages.
Building a WordPress theme is very complex, but using one is pretty simple.
Spend a bit of time in the customize menu and see what you can learn. The more you practice in WordPress the more comfortable you’ll get with the platform.
Learning WordPress is useful for maintaining your small business website and for future use if you ever want to launch another site.
But this should be enough info on design & theming. If you ever have specific questions or if you run into problems try searching in Google to see what comes up.
There’s a lot of help already online, much more than you’d think.
So let’s move onto the use of plugins and how to add these into your small biz website.
You can add extra functionality into your site with little things called plugins. Most are completely free and you can even search on WordPress to see what’s out there.
By default every new WordPress install comes with a handful of bundled plugins. None of these are really necessary.
Thankfully plugins are easy to remove.
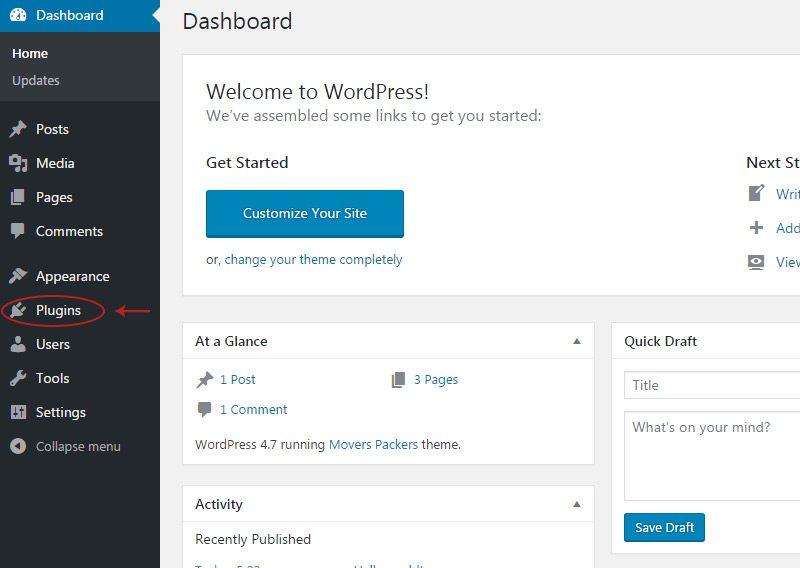
Click the “plugins” link in your admin menu and you should get a list of installed plugins.
Active plugins have a light blue background while the others are just installed but deactivated.
I don’t believe any of the default plugins are needed for a small business website so you can delete all of these.
First you should deactivate the plugins with a light blue background. You’ll find a “deactivate” link right under the plugin’s name.
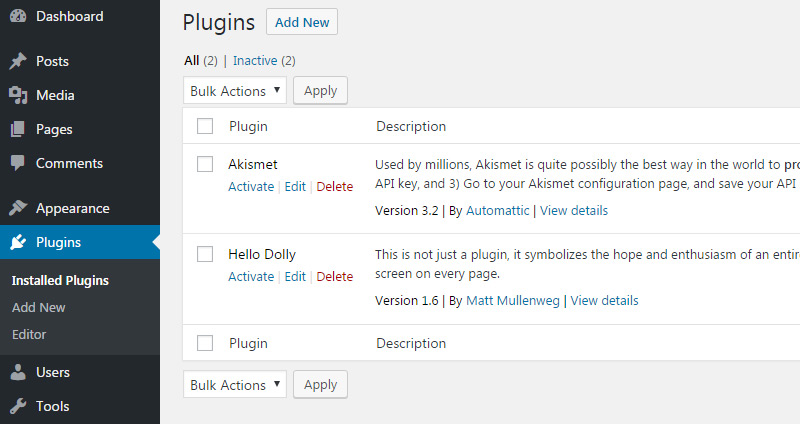
Once you deactivate a plugin the background should turn from blue to white. Now you’ll see a bright red “delete” link.
There’s no harm in leaving these plugins installed if you want. But I don’t like clutter on my sites and since you won’t need any of them I think they’re safe to delete.
Plus all the default plugins are free so you can always reinstall them if needed.
I always recommend 3 must-have plugins for every new WordPress site: caching, SEO, and a contact form. They’re all free and I’ll cover each one in detail below.
First let me explain how to install new plugins from scratch. This mimics the theme install process so it should feel familiar.
Click the “plugins” link in the admin menu and then click the “add new” link near the top of that page.
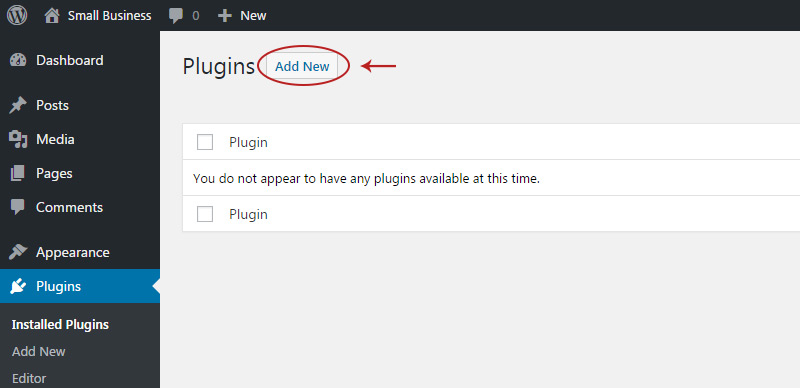
This page should look familiar because it’s structured just like the theme search page.
You’ll find a list of featured plugins along with a search bar in the top-right corner. You install plugins the same way: search for the name, hover and click the blue “install” button, then activate.
Simple enough, but what do you search for?
Well you can search for anything you want, but I have three WordPress plugins that I absolutely recommend for every small business website.
The topic of SEO can get complicated and pricey quickly. SEO is the stuff that optimizes your website to rank in Google and helps your customers find your website online.
If you want a simple website then you won’t have a budget for SEO work. Thankfully with Yoast SEO you don’t need a budget.
It’s a completely free plugin that does all the big work for you. Once you activate Yoast you can basically just let it run in the background. It only offers the basics but for a small business website that’s really all you need.

Once you activate the plugin you should see a new menu link labeled “SEO” with the Yoast logo beside it.
You can customize all the major features from this menu. It lets you change page titles, meta descriptions, and lets you generate a sitemap if you ever sign up for Google Webmaster Tools.
Don’t get too caught up in all of Yoast’s features because there is a lot to go through.
Just get Yoast activated and worry about customization later. The default settings are more than good enough for any business website.
My one complaint is the excessive Yoast bloat you get in the admin panel.
I always install the SO Hide SEO Bloat plugin along with Yoast because it clears up the interface but still keeps all the core Yoast functionality.
Both plugins are completely free and you can search them by name on the add new plugins page.
Next up is a caching plugin to make your site faster.
Caching is a complicated topic much like SEO, but generally speaking it’s meant to decrease page load time so your site loads faster. There are ways to configure this on the server but you have to be technically savvy.
Instead it’s far easier to go with a plugin like W3 Total Cache. It’s one of the most popular choices for WordPress and it’s super easy to setup.
Just install it and click “activate” and you’re good to go.
All the default W3TC settings are fine for a business site and you’ll never have tinker with this plugin. It’s always running and it’ll auto-cache any new pages you create so it’s completely hands off.
One alternative choice is WP Super Cache which is also a hands-off plugin.
Both are incredible and they’re both free so you really can’t go wrong either way. I personally recommend W3 Total Cache but if you don’t like it for whatever reason then switch to WP Super Cache and see what you think.
One thing to note: never keep both plugins activated at the same time. It can actually cause your site to run slower!
You can have both plugins installed at the same time, but make sure only one is active.
Every visitor on your site is a potential customer. Your site should offer enough information to help visitors understand what you do and how they can get in touch.
E-mail is often the easiest way to reach out so your website should have a contact form somewhere. This lets visitors send you an e-mail without needing to add your e-mail address publicly on the website.
The simplest plugin for this task is Contact Form 7.
You install the plugin just like all the others and once activated you should see a new “contact” link in your admin menu.
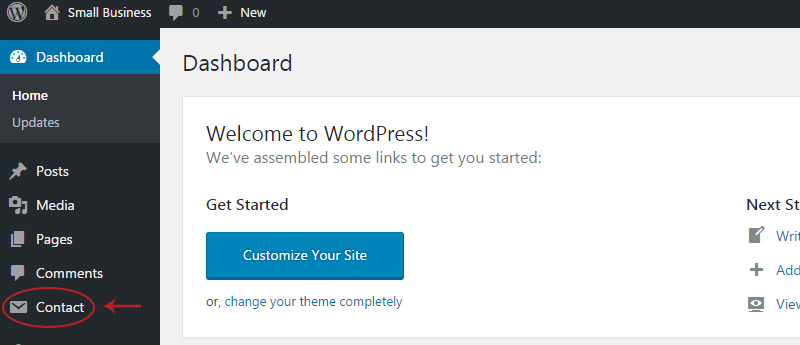
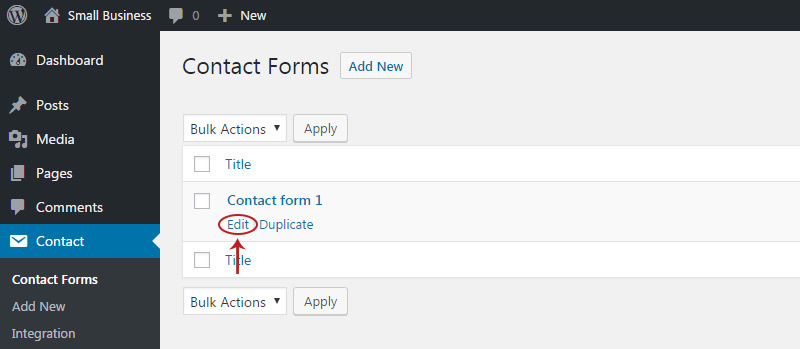
Click this and you’ll see there’s already a default form created. The default form has everything you need, although you can make changes by clicking the “edit” link under the title.
However it’s easiest to just use the default and add this right into your contact page.
Notice how there’s a column labeled “shortcode” with a code placed in square brackets [like this].
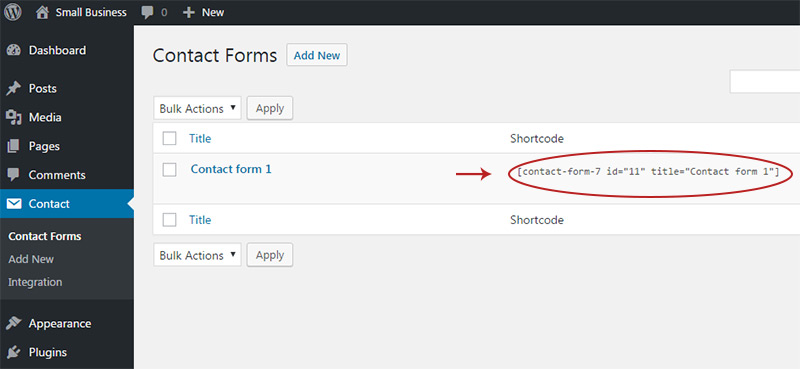
Copy that whole code into whatever page you want the contact form to appear.
In this case let’s say you want to make a new contact page. First copy that whole shortcode, it should look something like this:
Now hover the Pages link and click “add new” from the menu.
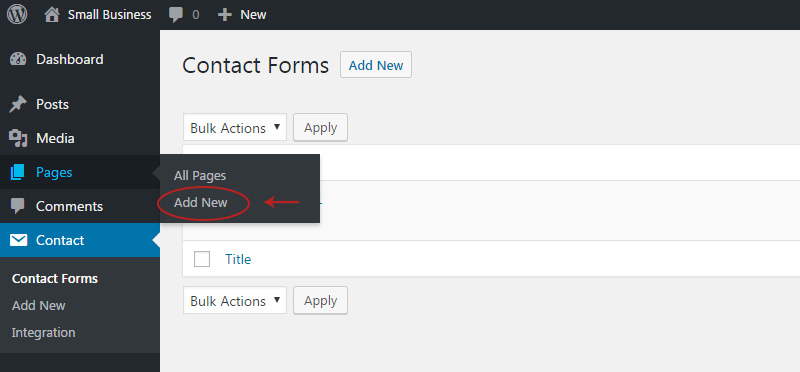
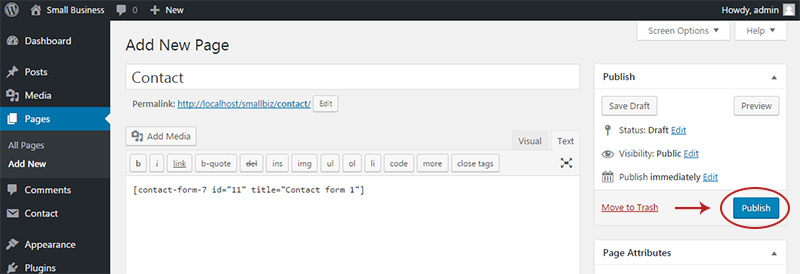
Paste this code into the page body and give the page whatever title you want.
Hit the blue publish button in the right-hand column and let it load. Then click the contact URL underneath the title field to visit the page on your site.
You should see a basic contact form that looks something like this:
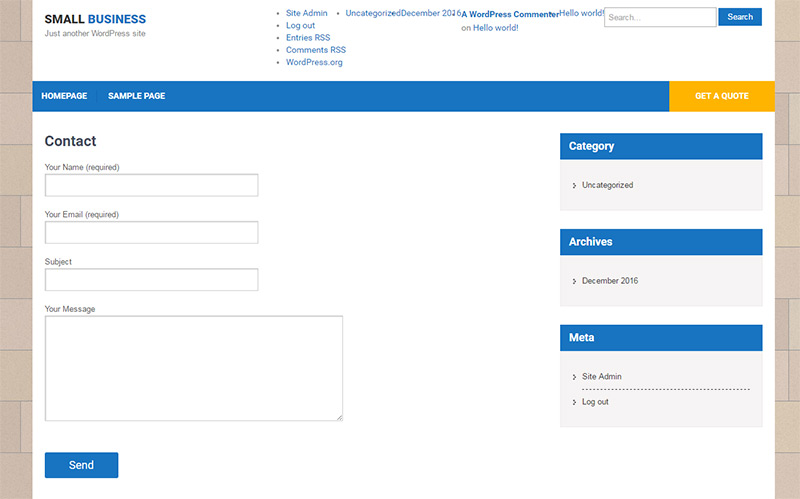
Now you should be all set to receive messages.
By default all emails go to your WordPress admin account’s e-mail. This should be whatever address you entered for BlueHost when you signed up.
But it’s super easy to change the delivery location.
Click the “Contact” link in the admin menu and then click the edit button underneath.
On this page you’ll see a few tabs. Click the 2nd tab labeled “Mail”.
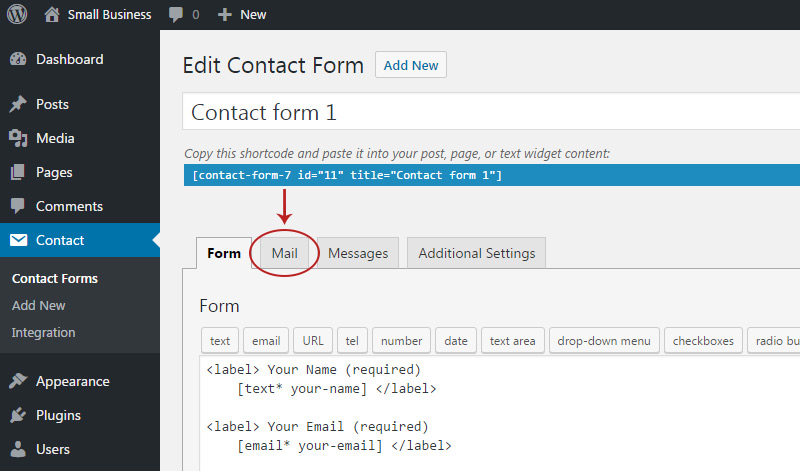
This page has two fields that show whatever address you’re currently using.
To change the address just enter your preferred e-mail in the “to” and “from” fields like so:
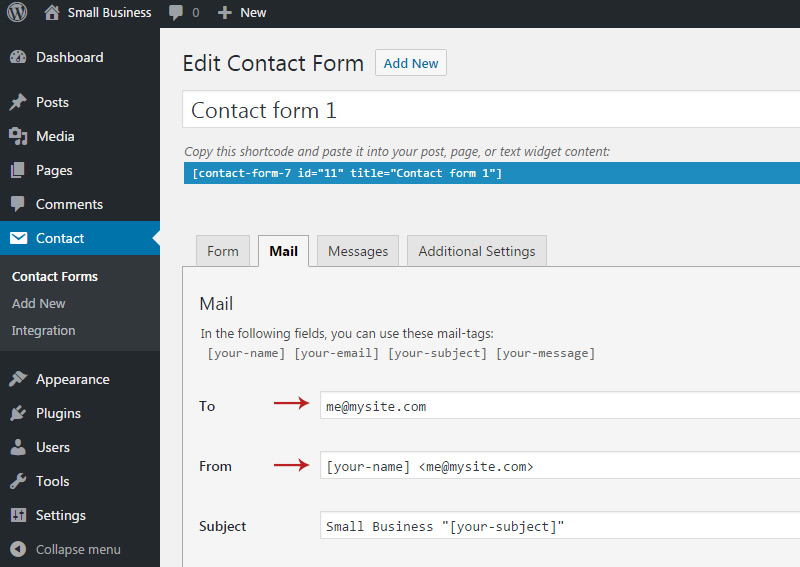
Then click the blue save button in the top right corner.
This may seem like a lot of work but it can be done in less than 5 minutes. And once you do this you never have to do it again.
All three of the plugins I mentioned here are easy-breezy. If you follow these instructions you can just let them sit and run in the background.
You will need to update them every so often but that’s an incredibly simple process which I’ll cover in the next(and final) section.
I’d like to wrap up by sharing a few tips for basic maintenance and upkeep. WordPress basically handles everything so once your site is online you can just let it sit there.
The only tasks you’d have to do are adding/editing content and minor updates.
To create new content you should follow the same procedure I showed above to create a contact page. You hover the Pages link and click “new page”, then add a title and body text.
You can always edit these pages by visiting the pages link and clicking “edit”.
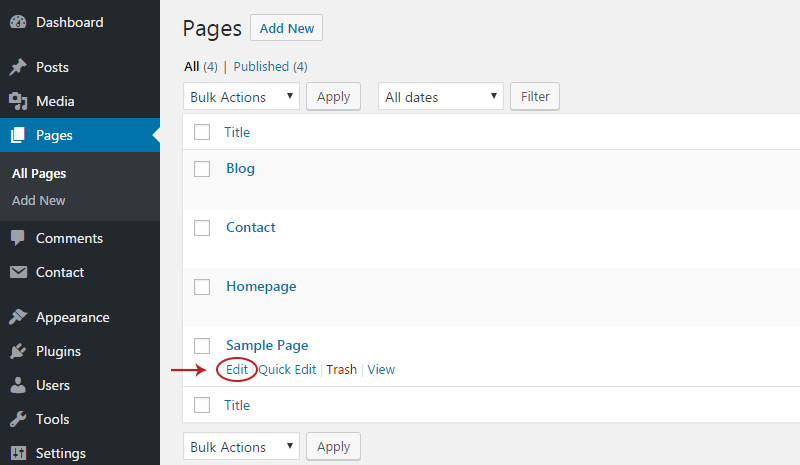
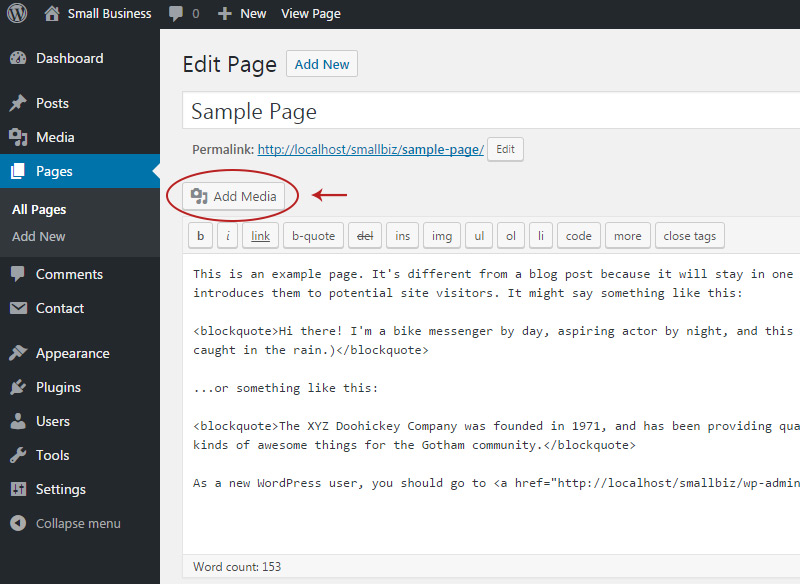
It’s also easy to upload images to your site from the edit page.
Whenever you’re working on a page you’ll see a button labeled “add media”. Click this to get an upload field.
In this new window you should see a tab labeled “upload files”. Click this tab and then click the big “select files” button in the center of the page.
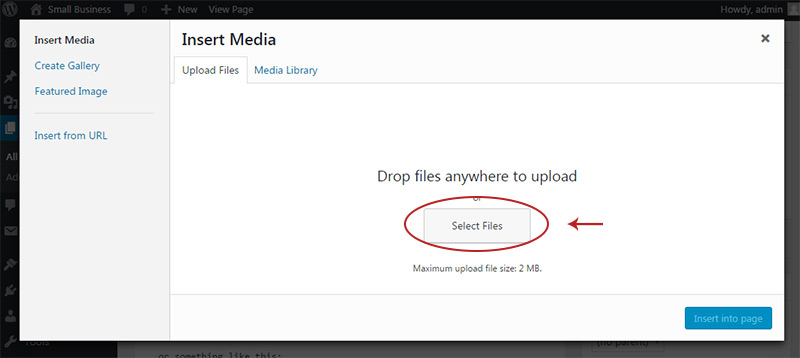
Now you can browse your computer, find the photo you want, and upload it right to your website.
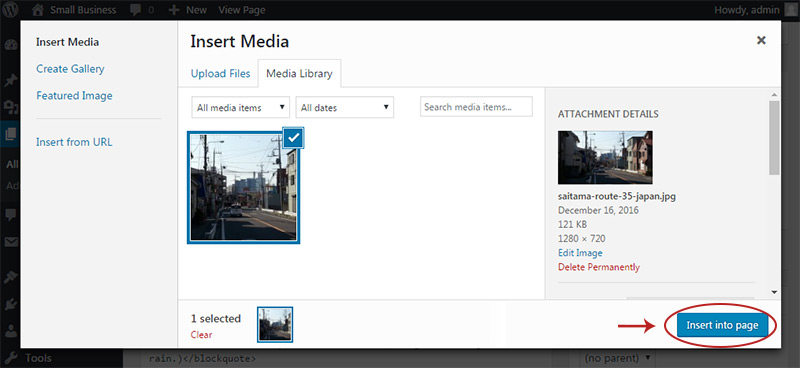
To add the image you just click the big blue “insert image” button in the media window. Make sure you select the right photo first.
Also make sure you click in the page editor where you want the image to appear. WordPress will add the image directly where your cursor is located, but you can always drag & drop the image to move it around.
These are the absolute basics and they’re all you really need to get your site running.
You can always rename pages, add new ones, or change their locations in the menu by visiting the “menus” link I covered earlier.
And if you ever bump into problems while editing your site please consider Googling the solution.
I know it may feel uncomfortable if you’ve never solved tech problems or managed your own website. But there are thousands of free guides online that cover all the basics of WordPress—most of them geared towards newbies.
The more you practice using WordPress the more you’ll learn and the more comfortable you’ll feel in the admin panel.
Lastly I want to cover updating your site. There are three major updates:
All three can be done at the same time and from the same page.
You’ll know if you need to update when you log into your admin panel and see a bright orange bubble with a number next to the “updates” link.
![]()
Click that link to visit the updates page.
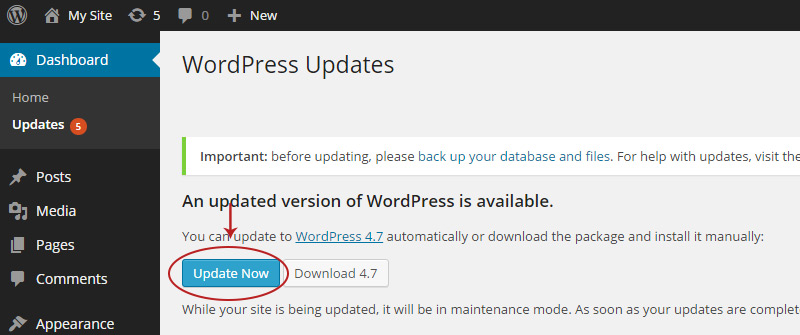
If you haven’t logged into your site for months then you’ll probably have quite a few updates to do.
It’s a good idea to first update WordPress if needed. You’ll see a button labeled “update” at the top and it’ll tell you which version of WordPress you’re installing.
Just click this button and let it load. It should only take a few moments to fully update.
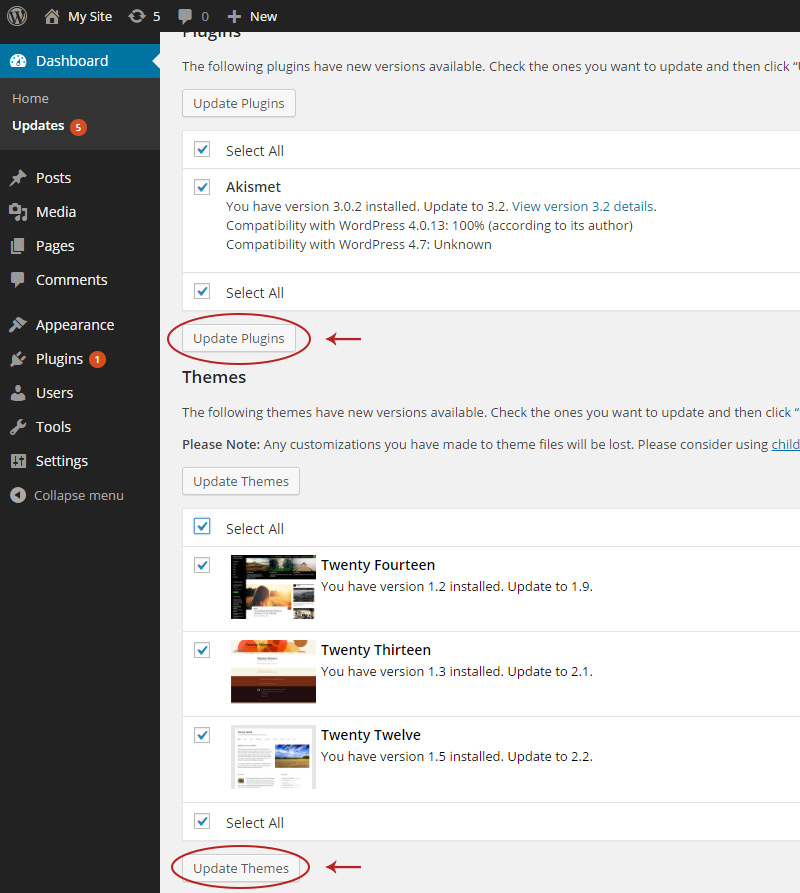
Then if there’s still more go back to the updates page and scroll down to see plugin/theme updates. These will be separated into two different areas.
You can quickly update everything by clicking the checkbox next to “select all” then clicking the update button. This has to be done separately for themes and plugins but the whole process should never take more than 2-3 minutes.
And with that I’d say we’ve reached the end of this guide.
I genuinely hope this has helped you understand more about WordPress and the process of setting up a business website from scratch.
Any small or midsize business owner should be able to follow these steps and publish a kick ass website for dirt cheap.
But if you’re confused or feel that any part of this guide could be improved please get in touch and share your thoughts.
I’m constantly trying to update this guide to make it better so feedback is greatly appreciated.
Thanks for reading this to the end & best of luck with your new website!
Jaime is a jr. designer interested in mobile UI/UX research and frontend web development with JavaScript frameworks. He covers general news and useful resources in the web design space.